Reviewing Timelines with Excel
Wednesday, November 3, 2010
Generating timelines used to be a manual method for me until I started to use Harlan Carvey's timeline tools and Kristinn Gudjonsson's log2timeline. I finally saw the light of the power of a timeline because the tools allow for the automated generation of timelines. This enabled me to focus on how to apply this technique in different types of investigations. My next step was to determine how to review the timelines and two methods that can be used are Grep and Microsoft Excel. The purpose of this post is to provide a tutorial on how to use Microsoft Excel 2007 to review timelines.
Grep and Excel both have the ability to examine timelines and to create custom timelines to display certain types of data. However, I prefer to use Excel over Grep because Excel allows me to keep track on my timeline examination. I can create a separate column for notes or I can highlight rows or text containing items of interest. I can even use a color scheme to highlight groups of rows that are related. For example, if a system is infected with two pieces of malware then I can use a certain color for each malware to highlight the rows associated with that malware. The following are various activities for reviewing a timeline with Excel.
* Getting Started
* Importing Timeline Data into Excel
* Filters
* Advanced Filters
* Find
Custom timelines can be created using Excel filters while the Find function can be used to examine the timeline. In my limited experience with timelines, I find there isn't a set order for these activities since the investigation will dictate what needs to be done. Sometimes I start out examining the timeline with Find while at other times I first create custom timelines in order to narrow down where to start examining the timeline with Find. This post will show the functionality of Excel filters and demonstrate how Find can be used for examinations.
Getting Started
The timeline first has to be generated and stored in the csv file format. I'm not going to discuss the creation of timelines but the following sites have information on the topic: Windows Incident Response blog, Log2timeline website, and the SANs forensic blog. One of the decisions that has to be made when creating timelines is to decide what data to include. The approach I take is to make a judgment call about the artifacts I might need based on the type of investigation and a few quick checks on the computer being examined. I include all of these artifacts in one timeline then I create custom timelines by applying Excel filters.
For this post, I didn't have the time to setup a scenario and a test system so I am using the image of the computer I referenced as Infected 1 in the post Is the System Infected. The timeline was created using tools in the Sift workstation including the Sleuthkit, regtime.pl, and an updated version of timescanner.
Side note: Kristinn Gudjonsson was kind enough to provide assistance to a complete stranger. He pointed out I was using an older version of log2timeline and helped me upgrade to the latest version. Timescanner now has an input module which allows you to specify what artifacts to include in the timeline instead of including everything. This is awesome; not only is timescanner faster but specifying only the artifacts you need speeds up the generation of timelines.
Back to the post, to review the timeline you should have a lead. This lead can come from numerous places such as a person’s statement, a website of interest, antivirus log, intrusion detection system alert, examination of a computer's auto-start locations or the examination of a computer's volatile data. The lead I'm using for this post came from the examination of volatile data. The examination located a few suspicious items which were the asr64_ldm.exe process, _VOIDd.sys driver, and DLLs with names starting with _void.
Importing Timeline Data into Excel
The timeline in the csv file can be directly opened by using Excel. However, I have had issues with trying to add edits to the timeline using this method. To avoid these issues I now import the csv file as a comma delimited file. (Note: selecting comma delimited results in rows containing commas being separated into different columns but I found the information I need to filter on still appears under the filename column. An example of a row containing commas is the parsed Windows event logs.)
The following steps outline how to import the csv file into Excel.
The Excel program needs to be opened first. The area to import external data is located on the Data Ribbon. The option to get data from a text file is required for a csv file.

The picture below shows the default option is to select the Fix Width. The issue with the Fixed Width is that the data is not separated into different columns as highlighted in the red box below.

The option for Delimited needs to be selected instead of using the default Fixed Width.

After you select the Delimted option the next page allows you to set delimiters in the data. I found using the comma delimiter separates the timeline data into the correct columns as shown below.

At this point the Finish button can be selected to import the csv file. Excel will prompt about where to import the data and the default selection of the existing blank worksheet is fine. The process may take a few seconds to a couple of minutes.

Filters
I mostly use filters to create custom timelines or to see relationships between data with the noise suppressed. Excel has two filter functions which are filters and advanced filters. Both filters can be accessed on the Data Ribbon.

Clicking the Filter icon activates Excel filters and the top row of the spreadsheet now has drop down menus for each column.

The drop down menu lets you apply a filter to the data in that column. A text filter can be applied to the column in order to create a custom timeline of your choice. For example, "event log" or "internet history" can be filtered under the File Name column to create a timeline of just the event logs or Internet usage while "March 11 2010" can be filtered under the Date column to create a timeline for March 11, 2010. The picture below shows the options for a text filter.

As you can see there are different types of text filters. To demonstrate this functionality I selected the Contains option underneath the File Name column. This brings up the Custom Autofilter window which allows you to specify only two variables for your filters. The limitation of two variables is why advanced filters are required. Two wildcards are available for filters which are the ? for a single character or the * for a series of characters. The picture below shows I am only using the word prefetch to only show rows containing this word.

The rows' numbers turn to blue indicating a filter is applied. Also, the column’s drop down arrow is changed to the filter icon. Both of these changes can be seen in the picture below.

If desired, a filter can be applied to the other columns that still have the drop down arrow. For example, I can apply a filter for ???b to the type column to further filter the data so only items that have been created are shown. The picture below shows there are two filters applied.

To remove the filters just click the Clear icon which is next to the Filter icon on the Data Ribbon. Click the Filter icon again in order to turn off the filter functionality.
Advanced Filters
I started looking into advanced filters when I wanted to create a custom timeline to show someone's Internet activity involving downloading numerous files. Basically, I wanted to use a combination of variables involving file names, folders, folder paths, parsed artifacts, and dates to create the timeline (I wanted to filter using about 20 different variables in the Date and File Name columns). I couldn't use the Excel filters since only two variables can be used so I started to look into advanced filters when I came across Excel Advanced Filter Introduction.
To use advanced filters you first have to set up a database within the worksheet. You can use the headings of the column you want to filter on but I find it easier to copy the entire top row right away so I don't have to change it later.

The database has to be setup outside of the data in the worksheet but I usually place it below the timeline data. The picture below shows the database is separated from the timeline data.

I use advanced filters in order to string together different functions (or/and) with different variables. The and statement is when the variables are on the same row. The picture below is the filter showing the row must have ???b under the Type column and prefetch under the File Name column. The asterisk is required around the word prefetch in order to filter on rows which contain the word prefetch.

The or statement occurs when the variables are on different rows. The picture below shows the filter to only show the rows with asr64_ldm or _void under the File Name column.

Another example of the or statement is below. This statement only wants to show the rows which have Mar 12 2010 under the Date column or Event Log under the File Name column.

Once the database is setup with the filter you want to apply then the next step is to apply the advanced filter. This will be demonstrated using the search for asr64_ldm or _void under the File Name column. First select a cell containing timeline data (this can be any cell containing the timeline data) then select the Advanced icon on the Data Ribbon.

The Advanced Filter window will appear with the default option to filter the list in place. You have the ability to copy the filtered data to another worksheet but this tutorial will be filtering the list in place. Excel should automatically detect the List Range but this can be verified by scrolling down to the last line of the timeline data. The List Range value should contain all of the rows and columns with timeline data (note the filename will be column H but Excel will have a higher column due to selecting comma delimited when importing data). The picture below shows the last row containing timeline data matching the last row in the List Range.

If all of the timeline data is reflected in the List Range then the Criteria Range needs to be verified. Excel may automatically detect this but the Criteria Range Excel detected for me was the previous filter I used. To configure the filter change the Criteria Range to match your filter. For example, the current selection is $A$157121:$A$1571 which is saying the filter is column A row 157121. This filter needs to be changed to show column H rows 157121 to 157123.
The Criteria Range value can be deleted then with your mouse you can first select cell H:157121 then hold down the shift key and select cell H:157123. This is shown below (note: the same way would be used to select a filter spanning multiple columns except the first cell would be under the first column).

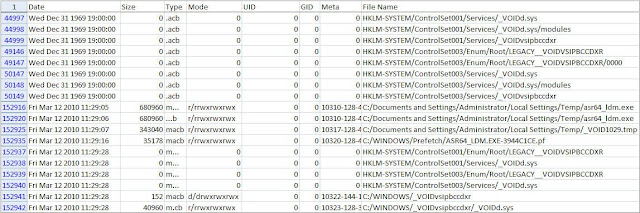
The OK button can be selected once the Criteria Range value is configured. The picture below shows a portion of the filter being applied to the data. As you can see, the filter shows the persistence mechanism for _voidd.sys is a service and asr64_ldm.exe was created on 03/12/10 at 11:29:06.
Find
I use Excel filters to create custom timelines or to see relationships between data while I use the Find funtion to examine the timeline since filters hide some the activity around an item of interest. To open the Find and Replace window you can use the key combination of CTRL and F or select the Find icon on the Home Ribbon. The picture below shows the Home Ribbon.

The Find and Replace window has the ability to find the next occurrence of a keyword or to find all occurrences of a keyword. This is accomplished by either selecting the Find Next or Find All option.

The Find Next option will be shown first by searching for the keyword asr64_ldm.exe. This search is only being performed to show how it works since the examination will use the Find All option. The picture below shows the search selects the first row containing asr64_ldm.exe.

I mostly use the Find Next option to determine if a keyword is present in the worksheet. For example, an antivirus scan might have been used to clean a system so I may search on the name of the malware to determine if the name is present anywhere else on the computer. I think the Find All option is the better method to examine the timeline since it not only enables you to quickly move around in the timeline but it's easier to review the activity around a keyword. The examination will start by first reviewing the initial programs of interest which are asr64_ldm.exe, _void.sys, and the DLLs' names starting with _void to determine which appeared first on the computer. The picture below shows the find All option being used to locate all occurrences of asr64_ldm.exe. As was mentioned previously, asr64_ldm.exe was created on 03/12/10 at 11:29:06.

The Find All option was used to search for the rogue driver _voidd.sys and this is shown below.

The Find All option was used to search for the rogue DLLs on the computer and this is shown below. The Find and Replace window shows the DLLs appear on the system after the _voidd.sys driver.

The _voidd.sys driver appeared on the system at 11:29:28 and this was 22 seconds after asr64_ldm.exe. This means the initial focus should be on the activity prior to asr64_ldm.exe appearing on the system. The Find All option was used to find the first occurrence of asr64_ldm.exe.

The activity before the first occurrence of asr64_ldm.exe shows that the administrator user account accessed a file called update.exe as can be seen in the picture below.

The Find All option was used to search for all references to the update.exe file on the computer. One of the interesting hits shows update.exe is associated with a website visited by the Administrator user account.

Advanced Filters during Examination
As I mentioned previously, I use advanced filters in order to see relationships between the data. The brief examination using the Find function identified a suspicious program being launched a few seconds before the first malware appeared on the system and this suspicious program is associated with the Internet. An advanced filter can be used to see the relationships between the data.
The picture below shows the filter being applied to see this relationship by using a combination of and statements being linked together by or statements. For example, Internet Explorer history or Temporary Internet Files folder activity for March 12, 2010 will appear in the timeline. The Criteria Range value for the filter in the picture below is Sheet1!$A$157121:$H$157132. (Note: I also included in the filter and statements to see the Prefetch folder activity and all files created on 03/12/10 at 11:28 or 11:29.)

The applied filter shows there wasn’t much Internet activity before update.exe being accessed since there were only two websites accessed. The website that stands out is highlighted in red.

The picture below shows a portion of the timeline with activity involving this website.
The examination isn't even close to being complete but I hope I was able to demonstrate how Excel could be used to review timelines. Excel provides you with the ability to create custom timelines, view relationships between data, or examine timelines.
I hope this tutorial has been helpful.
Grep and Excel both have the ability to examine timelines and to create custom timelines to display certain types of data. However, I prefer to use Excel over Grep because Excel allows me to keep track on my timeline examination. I can create a separate column for notes or I can highlight rows or text containing items of interest. I can even use a color scheme to highlight groups of rows that are related. For example, if a system is infected with two pieces of malware then I can use a certain color for each malware to highlight the rows associated with that malware. The following are various activities for reviewing a timeline with Excel.
* Getting Started
* Importing Timeline Data into Excel
* Filters
* Advanced Filters
* Find
Custom timelines can be created using Excel filters while the Find function can be used to examine the timeline. In my limited experience with timelines, I find there isn't a set order for these activities since the investigation will dictate what needs to be done. Sometimes I start out examining the timeline with Find while at other times I first create custom timelines in order to narrow down where to start examining the timeline with Find. This post will show the functionality of Excel filters and demonstrate how Find can be used for examinations.
Getting Started
The timeline first has to be generated and stored in the csv file format. I'm not going to discuss the creation of timelines but the following sites have information on the topic: Windows Incident Response blog, Log2timeline website, and the SANs forensic blog. One of the decisions that has to be made when creating timelines is to decide what data to include. The approach I take is to make a judgment call about the artifacts I might need based on the type of investigation and a few quick checks on the computer being examined. I include all of these artifacts in one timeline then I create custom timelines by applying Excel filters.
For this post, I didn't have the time to setup a scenario and a test system so I am using the image of the computer I referenced as Infected 1 in the post Is the System Infected. The timeline was created using tools in the Sift workstation including the Sleuthkit, regtime.pl, and an updated version of timescanner.
Side note: Kristinn Gudjonsson was kind enough to provide assistance to a complete stranger. He pointed out I was using an older version of log2timeline and helped me upgrade to the latest version. Timescanner now has an input module which allows you to specify what artifacts to include in the timeline instead of including everything. This is awesome; not only is timescanner faster but specifying only the artifacts you need speeds up the generation of timelines.
Back to the post, to review the timeline you should have a lead. This lead can come from numerous places such as a person’s statement, a website of interest, antivirus log, intrusion detection system alert, examination of a computer's auto-start locations or the examination of a computer's volatile data. The lead I'm using for this post came from the examination of volatile data. The examination located a few suspicious items which were the asr64_ldm.exe process, _VOIDd.sys driver, and DLLs with names starting with _void.
Importing Timeline Data into Excel
The timeline in the csv file can be directly opened by using Excel. However, I have had issues with trying to add edits to the timeline using this method. To avoid these issues I now import the csv file as a comma delimited file. (Note: selecting comma delimited results in rows containing commas being separated into different columns but I found the information I need to filter on still appears under the filename column. An example of a row containing commas is the parsed Windows event logs.)
The following steps outline how to import the csv file into Excel.
The Excel program needs to be opened first. The area to import external data is located on the Data Ribbon. The option to get data from a text file is required for a csv file.

The picture below shows the default option is to select the Fix Width. The issue with the Fixed Width is that the data is not separated into different columns as highlighted in the red box below.

The option for Delimited needs to be selected instead of using the default Fixed Width.

After you select the Delimted option the next page allows you to set delimiters in the data. I found using the comma delimiter separates the timeline data into the correct columns as shown below.

At this point the Finish button can be selected to import the csv file. Excel will prompt about where to import the data and the default selection of the existing blank worksheet is fine. The process may take a few seconds to a couple of minutes.

Filters
I mostly use filters to create custom timelines or to see relationships between data with the noise suppressed. Excel has two filter functions which are filters and advanced filters. Both filters can be accessed on the Data Ribbon.

Clicking the Filter icon activates Excel filters and the top row of the spreadsheet now has drop down menus for each column.
The drop down menu lets you apply a filter to the data in that column. A text filter can be applied to the column in order to create a custom timeline of your choice. For example, "event log" or "internet history" can be filtered under the File Name column to create a timeline of just the event logs or Internet usage while "March 11 2010" can be filtered under the Date column to create a timeline for March 11, 2010. The picture below shows the options for a text filter.

As you can see there are different types of text filters. To demonstrate this functionality I selected the Contains option underneath the File Name column. This brings up the Custom Autofilter window which allows you to specify only two variables for your filters. The limitation of two variables is why advanced filters are required. Two wildcards are available for filters which are the ? for a single character or the * for a series of characters. The picture below shows I am only using the word prefetch to only show rows containing this word.

The rows' numbers turn to blue indicating a filter is applied. Also, the column’s drop down arrow is changed to the filter icon. Both of these changes can be seen in the picture below.

If desired, a filter can be applied to the other columns that still have the drop down arrow. For example, I can apply a filter for ???b to the type column to further filter the data so only items that have been created are shown. The picture below shows there are two filters applied.

To remove the filters just click the Clear icon which is next to the Filter icon on the Data Ribbon. Click the Filter icon again in order to turn off the filter functionality.
Advanced Filters
I started looking into advanced filters when I wanted to create a custom timeline to show someone's Internet activity involving downloading numerous files. Basically, I wanted to use a combination of variables involving file names, folders, folder paths, parsed artifacts, and dates to create the timeline (I wanted to filter using about 20 different variables in the Date and File Name columns). I couldn't use the Excel filters since only two variables can be used so I started to look into advanced filters when I came across Excel Advanced Filter Introduction.
To use advanced filters you first have to set up a database within the worksheet. You can use the headings of the column you want to filter on but I find it easier to copy the entire top row right away so I don't have to change it later.
The database has to be setup outside of the data in the worksheet but I usually place it below the timeline data. The picture below shows the database is separated from the timeline data.

I use advanced filters in order to string together different functions (or/and) with different variables. The and statement is when the variables are on the same row. The picture below is the filter showing the row must have ???b under the Type column and prefetch under the File Name column. The asterisk is required around the word prefetch in order to filter on rows which contain the word prefetch.
The or statement occurs when the variables are on different rows. The picture below shows the filter to only show the rows with asr64_ldm or _void under the File Name column.

Another example of the or statement is below. This statement only wants to show the rows which have Mar 12 2010 under the Date column or Event Log under the File Name column.

Once the database is setup with the filter you want to apply then the next step is to apply the advanced filter. This will be demonstrated using the search for asr64_ldm or _void under the File Name column. First select a cell containing timeline data (this can be any cell containing the timeline data) then select the Advanced icon on the Data Ribbon.

The Advanced Filter window will appear with the default option to filter the list in place. You have the ability to copy the filtered data to another worksheet but this tutorial will be filtering the list in place. Excel should automatically detect the List Range but this can be verified by scrolling down to the last line of the timeline data. The List Range value should contain all of the rows and columns with timeline data (note the filename will be column H but Excel will have a higher column due to selecting comma delimited when importing data). The picture below shows the last row containing timeline data matching the last row in the List Range.

If all of the timeline data is reflected in the List Range then the Criteria Range needs to be verified. Excel may automatically detect this but the Criteria Range Excel detected for me was the previous filter I used. To configure the filter change the Criteria Range to match your filter. For example, the current selection is $A$157121:$A$1571 which is saying the filter is column A row 157121. This filter needs to be changed to show column H rows 157121 to 157123.
The Criteria Range value can be deleted then with your mouse you can first select cell H:157121 then hold down the shift key and select cell H:157123. This is shown below (note: the same way would be used to select a filter spanning multiple columns except the first cell would be under the first column).

The OK button can be selected once the Criteria Range value is configured. The picture below shows a portion of the filter being applied to the data. As you can see, the filter shows the persistence mechanism for _voidd.sys is a service and asr64_ldm.exe was created on 03/12/10 at 11:29:06.

Find
I use Excel filters to create custom timelines or to see relationships between data while I use the Find funtion to examine the timeline since filters hide some the activity around an item of interest. To open the Find and Replace window you can use the key combination of CTRL and F or select the Find icon on the Home Ribbon. The picture below shows the Home Ribbon.
The Find and Replace window has the ability to find the next occurrence of a keyword or to find all occurrences of a keyword. This is accomplished by either selecting the Find Next or Find All option.

The Find Next option will be shown first by searching for the keyword asr64_ldm.exe. This search is only being performed to show how it works since the examination will use the Find All option. The picture below shows the search selects the first row containing asr64_ldm.exe.

I mostly use the Find Next option to determine if a keyword is present in the worksheet. For example, an antivirus scan might have been used to clean a system so I may search on the name of the malware to determine if the name is present anywhere else on the computer. I think the Find All option is the better method to examine the timeline since it not only enables you to quickly move around in the timeline but it's easier to review the activity around a keyword. The examination will start by first reviewing the initial programs of interest which are asr64_ldm.exe, _void.sys, and the DLLs' names starting with _void to determine which appeared first on the computer. The picture below shows the find All option being used to locate all occurrences of asr64_ldm.exe. As was mentioned previously, asr64_ldm.exe was created on 03/12/10 at 11:29:06.

The Find All option was used to search for the rogue driver _voidd.sys and this is shown below.

The Find All option was used to search for the rogue DLLs on the computer and this is shown below. The Find and Replace window shows the DLLs appear on the system after the _voidd.sys driver.

The _voidd.sys driver appeared on the system at 11:29:28 and this was 22 seconds after asr64_ldm.exe. This means the initial focus should be on the activity prior to asr64_ldm.exe appearing on the system. The Find All option was used to find the first occurrence of asr64_ldm.exe.

The activity before the first occurrence of asr64_ldm.exe shows that the administrator user account accessed a file called update.exe as can be seen in the picture below.
The Find All option was used to search for all references to the update.exe file on the computer. One of the interesting hits shows update.exe is associated with a website visited by the Administrator user account.

Advanced Filters during Examination
As I mentioned previously, I use advanced filters in order to see relationships between the data. The brief examination using the Find function identified a suspicious program being launched a few seconds before the first malware appeared on the system and this suspicious program is associated with the Internet. An advanced filter can be used to see the relationships between the data.
The picture below shows the filter being applied to see this relationship by using a combination of and statements being linked together by or statements. For example, Internet Explorer history or Temporary Internet Files folder activity for March 12, 2010 will appear in the timeline. The Criteria Range value for the filter in the picture below is Sheet1!$A$157121:$H$157132. (Note: I also included in the filter and statements to see the Prefetch folder activity and all files created on 03/12/10 at 11:28 or 11:29.)

The applied filter shows there wasn’t much Internet activity before update.exe being accessed since there were only two websites accessed. The website that stands out is highlighted in red.

The picture below shows a portion of the timeline with activity involving this website.

The examination isn't even close to being complete but I hope I was able to demonstrate how Excel could be used to review timelines. Excel provides you with the ability to create custom timelines, view relationships between data, or examine timelines.
I hope this tutorial has been helpful.


Very cool! I love seeing how different analysts solve problems like this. Thanks!
Would this work okay with Calc?
> work okay with Calc
Good question. I am not that familiar with Calc so I don't know about the program's filter or find capabilities. However, I'm curious about it as well since you mentioned it. I'll try to look into it over the next week.
I quickly looked into Calc and the program appears to have similar functionality as Excel for reviewing timelines. I'm going to process the same timeline with Calc to see how Excel and Calc compare against each other as it relates to timelines. Stay tuned for a post about using Calc as an alternative to Excel for reviewing timelines.
Thanks for the comments.