Finding the Initial Infection Vector
Sunday, November 20, 2011
There are different ways to spread malware. Email, instant messaging, removable media, or websites are just a few options leveraged to infect systems. One challenge when performing an examination is determining how the malware ended up on the system which is also referred to as identifying the malware’s initial infection vector (IIV). A few obstacles in determining the IIV is that a system changes over time: files are deleted, programs are installed, temporary folders are emptied, browser history is cleared, or an antivirus program cleaned the system. Every one of those obstacles may hinder the examination. However, they don’t necessary result in not being able to narrow down the IIV since some artifacts may still be present on the system pointing to the how.
There are various reasons provided why an examination isn’t performed on a malware infected system to locate the IIV. I first wanted to point out why taking the time to find the IIV is beneficial instead of focusing on the reasons why people don’t. The purpose of the root cause analysis is to identify the factors lead up to the infection and what actions need to be changed to prevent the reoccurrence of a similar incident. If the infected system is just cleaned and put back into production then how can security controls be adjusted or implemented to reduce malware infecting systems in a similar manner? Let’s see how this works by skipping the root cause analysis and placing blame on a user opening a SPAM email. A new security awareness initiative educates employees on not opening SPAM email which does very little if the malware was a result of a break down in the patch management process. Skipping figuring out the IIV is not only a lost opportunity for security improvements but it prevents knowing when the infection first occurred and what data may have been exposed. This applies to both organizations and individuals.
Determining how the malware infected a system is a challenge but that's not a good enough reason to not try. It may be easier to say it can’t be done, takes too much resources or it's not worth it since someone (aka users) never listen and did something they weren’t suppose to. As a learning opportunity I’m sharing how I identified the initial infection vector in a recent examination by showing my thought process and tool usage.
First things first… I maintain the utmost confidentiality in any work I perform whether if it’s DFIR or vulnerability assessments. At times on my blog I write detailed posts about actual examinations I performed and every time I’ve requested permission to do so. This post is no different. I was told I can share the information for the greater good since it may help educate others in the DFIR community who are facing malware infected systems.
Background Information
People don’t treat me as their resident “IT guy” to fix their computer issues anymore. They now usually contact me for another reason because they are aware that I’ve been cleaning infected computers for the past year free of charge. So it’s not a strange occurrence when someone contacts me saying their friend/colleague/family member/etc appears to be infected with a virus and needs a little help. That’s pretty much how this examination came about and I wasn’t provided with any other information except for two requests:
* Tell them how the infection occurred so they can avoid this from happening again
* Remove the viruses from the computer
Investigation Plan
The methodology used throughout the examination is documented on the jIIr Methodology Page. I separated the various system examination steps into the first three areas listed below.
1. Verify the system is infected
2. Locate all malware present on the system
3. Identify the IIV
4. Eradicate the malware and reset any system changes
I organized the areas so each one will build on the previous one. My initial activities were to verify that the system was actually infected as opposed to the requester interpreting a computer issue as an infection. To accomplish this I needed to locate a piece of malware on the system either through antivirus scanning or reviewing the system auto-run locations. If malware was present then the next thing I had to do was locate and document every piece of malware on the computer by: obtaining general information about the system, identifying files created around the time frame malware appeared, and reviewing the programs that executed on the system. The examination would require since the technique excels at highlighting malware on a system. The third area and the focus of this post was to identify the initial infection vector. The IIV is detected by looking at the system activity in the timeline around the timeframe when each piece of malware was dropped onto the system. The activity can reveal if all of the malware is from the same attack or if there were numerous attacks resulting in different malware getting dropped onto the system. The final area is to eradicate every malware identified.
Note: Some activities were conducted in parallel to save time. To make it easier for people to follow my examination I identified each activity with the symbol <Step #>, the commands I ran are in bold, and registry and file paths are italicized.
Verifying the Infection
The computer’s hard drive was connected to my workstation and a software write blocker prevented the drive from being modified. I first reviewed the master boot record (MBR) to see the drive configuration I was dealing with and to check for signs of MBR malware <Step 1>. I ran the Sleuthkit command: mmls.exe -B \\.\PHYSICALDRIVE1 (the -B switch shows the size in bytes). There was nothing odd about the hard drive configuration and I found out that additional time was needed to complete the examination since I was dealing with a 500 GB hard drive. To assist with identifying known malware on the system I fired off a Kaspersky antivirus scan against the drive <Step 2>.
Knowing the antivirus scan was going to take forever to complete I moved on to checking out the system’s auto-runs locations for any signs of infection. The Sysinternals AutoRuns for Windows utility was executed against the Windows folder and the only user profile on the system <Step 3>. In the auto-runs I was looking for unusual paths launching executables, misspelled file names, and unusual folders/files. It wasn’t long before I came across an executable with a random name in the HKCU\SOFTWARE\Microsoft\Windows NT\CurrentVersion\Winlogon\Shell registry key.
 The HKCU\Software\Microsoft\Windows\CurrentVersion\Run registry key also listed under Auto-runs Logon tab showed that the C:\Users\John_Doe\AppData\Roaming folder had more than just one randomly named executable. The key also showed an additional location which was the C:\Users\John_Doe\AppData\Roaming\Microsoft folder.
 I added the hard drive as an evidence item in FTK Imager v3 to review the folders and executables identified by the Auto-runs utility <Step 4>. I noticed there were two additional executables located directly underneath the Roaming folder with the names iexplore.exe and java.exe. Both files had the same MD5 hash e4c2a000e715d16ec25e2b0a0fb3532f so to confirm the infection I searched for the hash in the Malware Analysis Search custom Google search. There was one search hit for VirScan.org and a few scanners flagged the file as malware (Kaspersky identified it as Trojan.Win32.FakeAV.emha). I followed the similar process to confirm that the other executables were malware as well. At this point I no longer needed the antivirus scan to finish since the infection was verified through other means. Before I moved onto manually locating all malware on the system I needed to document what my timeframe of interest was. I looked at the last modification times and creation times for all the folders/files I found. The rough timeframe spanned over a few days: from 10\13\2011 1:29:34 AM to 10/08/11 11:38:48PM. The picture below shows the last modification times for a few folders in the C:\Users\John_Doe\AppData\Roaming folder.

Locating All Malware on the System
After I verified the system was in fact infected I then proceeded to locate and document every piece of malware. First I had to shed light on the system’s configuration since it would impact how I performed my analysis <Step 5>. I used my regripper-general-os-info.bat batch file to run RegRipper against the system’s registry hives including the one profile’s NTUSER.dat hive. Below I highlighted some information and to the right of the arrow are quick notes about its significance.
* Operating system was Windows 7 Home Premium <= affected what artifacts are available and where they are located
* OS Install Date was Sun Feb 20 23:26:29 2011 (UTC) <= may assist with identify activity occurring before this date
* Timezone was Eastern Standard <= needed to understand time information
* The registry setting NtfsDisableLastAccessUpdate was enabled <= can’t use files’ last access times since it’s not tracked (default setting in Windows 7)
* Profilelist registry key only showed one user account besides the default ones <= focused the examination around the activity for one specific user account
* Installer\UserData registry key showed the following programs: Microsoft Office 2010 including Outlook, iTunes v.10, QuickTime v.7.69, Adobe Reader v9.3.4, and Java(TM) 6 Update 17 <= identified applications that could have been responsible for the malware infection
* Default browser plugin showed the default browser was Internet Explorer <= system had two web browsers (Chrome was the other) so my initial focus is on the artifacts from the default one
* Listsoft registry key showed McAfee <= McAfee antivirus software was on the system and its logs may show additional information about the infection.
I opted for the timeline analysis technique to locate all malware on the system and the general information obtained about the system helped to narrow down my artifact list to incorporate into my timeline. Building a timeline on a 500 GB hard drive was going to take some time so I looked at the McAfee logs before tying up my workstation <Step 6>. I exported the McAfee logs with FTK Imager and reviewed them using Notepad ++. The last entry in the log occurred at 10/16/2011 6:50:09 PM and it logged that the file "C:\windows\system32\consrv.DLL" was detected as Generic.dx!bbd4. The next entry didn’t occur until 10/12/11 but there were numerous log entries leading right up until 10/08/11. A few detections included Generic Dropper!1cj, DNSChanger!fa, and Artemis!E4C2A000E715 and they were for files located the folders C:\Users\John_Doe\AppData\Local\Temp\, C:\Windows\assembly\tmp\, and C:\windows\syswow64\. The flurry of McAfee detections for files other than cookies stopped at 10/8/2011 11:37:38 PM as shown in the picture below.
 The McAfee log identified potential additional malware on the system and expanded my timeframe to 10/16/2011 6:50:09 PM to 10/08/11 11:37:38 PM. A significant piece of information the log highlighted was Internet activity occurred just before the first detection. I leverage the timeline analysis technique for the rest of the examination. I created a timeline by incorporating the following artifacts: event logs (evtx), registry hives (system, software, and ntuser), link files (win_link), prefetch files (prefetch), Internet Explorer history (iehistory), and the Master File Table (mft) <Step 7>. I ran the following command but replaced the plugin and file path for each desired artifact: log2timeline.pl -f evtx -w timeline.csv E:\Windows\System32\winevt\Logs\Application.evtx. Once my timeline was built I then I started my search for all malware on the system.
Identify the IIV
Locating all malware present on the system and identifying the IIV are not separate activities when I perform timeline analysis. The only reason I separated them was to make it easier to explain my thought process. In actuality the two go hand in hand. Each time a piece of malware is located the system activity around the malware is examined to determine what contributed to the malware being created. Approaching timeline analysis in this manner will help determine if the malware is from the one attack or multiple attacks at different points in time. I review timelines working backwards in time since I find that it’s easier to spot the IIV. Each time I come across a file that could be malicious I first review the file’s header (in this examination I used FTK Imager), perform searches for the file’s MD5 hash (search order is Malware Analysis Search, VirusTotal, and then Google), and at times if the hash search results in no hits and the file type is of interest then I may upload the file to VirusTotal to see if it’s detected. I continue this process in the timeline until I reach the point where the malware activity stops and that’s usually where the IIV is located.
To assist with confirming malicious files I used FTK Imager to export a file hash list for the entire hard drive <Step 8>. It’s a lot easier to already have files’ hashes on hand then it is to calculate the hash each time I come across a new file. I started working my timeline keeping in mind everything I found including the timeframe 10/16/2011 6:50:09 PM to 10/08/11 11:37:38 PM. Besides the timestamps that were not accurate (reflects activity in future) the timeline ended on 10/16/2011 so that is where I started my analysis. I first saw the consrv.dll file detected by McAfee but there were no artifacts around the malware indicating it was the result of a different attack.
 After 10/16/11 the next activity started appearing in the timeline on 10/12/11. I found the same thing; more malware and artifacts associated with malware but no artifacts indicating an attack occurred.

I kept working the timeline going backwards in time. I kept finding more malware and malware artifacts but nothing pointing to an IIV explaining how the malware got onto the system. I finally reached the earliest time I noted which was 10/08/11 11:37:38 PM. There was a lot of activity involving files with similar names to the ones reflected in the McAfee log file.
 I continued working backwards until I saw no more activity involving the C:\Windows\assessmbly\tmp\U\ folder which is shown in the screenshot below. The U folder was created on the system at the same time as a file resembling a configuration file. One line in the file was srv=hxxps://212.36.9.52/ and my research showed the address appeared in a blacklist and the spsyeyetracker IP blocklist. The activity just before the U folder and configuration file were created was an executable named dbywqomgec (MD5 hash a70e5c48612159b3e936d7e478f4d451) appearing in the John_Doe’s temp folder. VirusTotal showed a few antivirus programs identified the file as a dropper (Microsoft detection was TrojanDropper:Win32/Sirefef.B). Afterwards I analyzed the file with ThreatExpert to see what changes the malware caused.
 The activity on the system before the dropper (MD5 hash a70e5c48612159b3e936d7e478f4d451) appeared on the system was a file showing up in the Java cache folder as shown below.
 I previously discussed the forensic significance Java index files provide in the post (Almost) Cooked Up Some Java. I exported the Java index file 46e770f3-38b55d85.idx with FTK Imager and looked at the file with Notepad ++. The file’s contents are shown below.
 The index file 46e770f3-38b55d85.idx showed a few interesting tidbits. First the file 46e770f3-38b55d85 was downloaded from the URL hxxp://www.seyminck.com/FFFO009/560[dot]gif which had the IP address 212.95.55.40. Secondly, the URL indicated the file was a gif image but the index recorded the file as an application. I checked the file 46e770f3-38b55d85 (MD5 hash 2e833ac26483aaad13a8051bc857ef15) header and it was indeed an executable since the file started with MZ. I analyzed the file with ThreatReport and it was identified as a dropper (Microsoft detection was TrojanDropper:Win32/Sirefef.B). The IIV still wasn’t located so I looked at the activity just before the dropper appeared in the Java cache. The activity showed at the same time another duplicate of the dropper (MD5 hash 2e833ac26483aaad13a8051bc857ef15) appeared in the John_Doe’s temp folder with the file name 0.945837921339929.exe. Four seconds beforehand a file appeared in the Java cache folder which can be seen below highlighted in red.
 The Java index file 25e8c780-5c17647b.idx was exported with FTK Imager and read with Notepad ++. The information contained in the index showed that a Java archive file was downloaded from the URL hxxp://www.seyminck(dot)com/FFFO009/RRo/realestate (IP address 212.95.55.40). The Java archive came from the same domain and IP address as the executable located in the Java cache folder. I exported the Java archive 25e8c780-5c17647b (MD5 hash 6b478de65071d94c670a0bfa369a7890) and confirmed the file was a Jar file by examining it with JD-GUI. The MD5 hash search didn’t result in any hits so I uploaded the file to VirusTotal and only 2 out of 42 antivirus products detected it as an exploit. I wanted to know if Java actually executed around the time the exploit appeared in the cache. I exported and reviewed the Java log file C:\Users\John_Doe\AppData\Local\Temp\java_install_reg.log and the log showed Java did in fact execute.
 The last piece I needed to identify the IIV was to determine what delivered the exploit to the system. The activity on the system before the exploit answered that question as shown below.
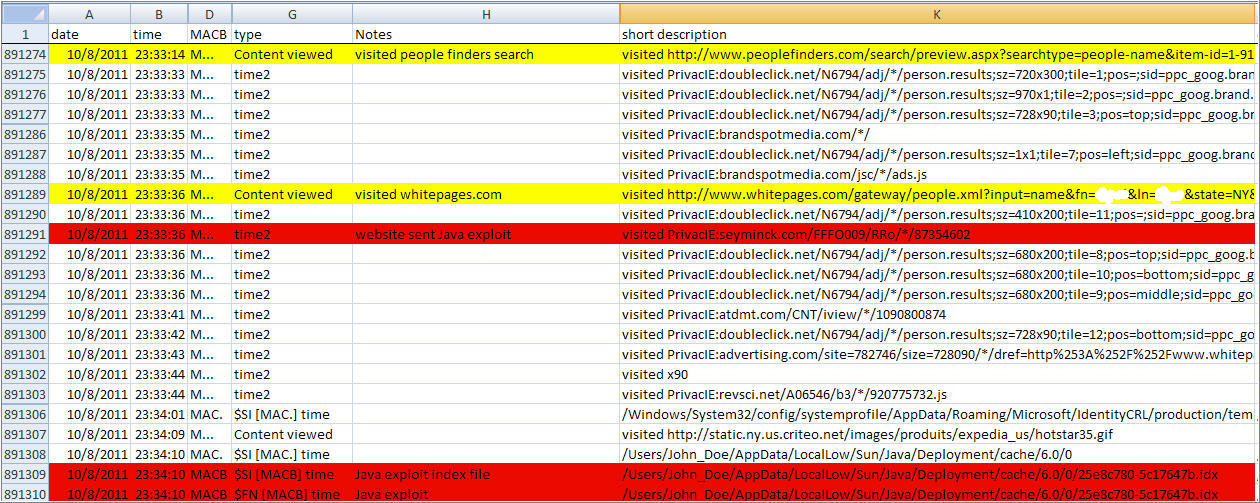
 There was a PrivacIE entry for seyminck(dot)com/FFFO009/RRo/*87354602 which means the exploit came from third party content being displayed on a website. The PrivacIE entry was mixed in with activity resembling advertisements from the user searching for someone on peoplefinder and whitepages websites. I continued working backwards in the timeline but there was no more malware activity. The IIV was identified. A user was surfing the Internet when a website visited was hosting third party content which resulted in a successful drive-by download targeting a Java vulnerability.
More Information about the IIV
The Java archive 25e8c780-5c17647b (MD5 hash 6b478de65071d94c670a0bfa369a7890) didn’t have to be examined closer in order to identify the IIV. However, I wanted to better understand how to examine Jar files since they may provide more information about the IIV and help explain some files found on the system. I debated if I should put this section in another blog post because I didn’t want people to think this activity had to be done in order to figure out the IIV. I opted to include the information since it sheds light on what occurred when the exploit was downloaded.
The code in the Jar file was obfuscated to conceal its purpose. I reached out to the Win4n6 group about any methods to automate analyzing Jar files with obfuscated code. A few members pointed me to Java de-obfuscation tools and I’m still in the process of trying to learn how to use them. Another member mentioned that Java obfuscation appears to be not making analysts’ life difficult, but to evade detection by antivirus. The person went on to say the obfuscation is usually weak so it’s relatively simple to de-obfuscate. My first reaction was it may be simple for Java programmers but it seemed impossible to me; I know nothing about Java besides the artifacts left by Java exploits. I took a shot at manually trying to see what the Jar file did by focusing on trying to follow the logic associated the variables, class methods, and functions in the code (I don’t know the Java syntax so if I butcher the names of things such as functions then you know why).
I opened the Java archive 25e8c780-5c17647b in JD-GUI and looked at the manifest file to see the wall Java class gets executed first.
 I extracted the Java source code by using the “Save All Sources” option in JD-GUI. I started reviewing the obfuscated source code in the Wall Java class when I saw two lines of code making a call to the Java method Muuum.kjdhfdkjg or Muuum.idufhidufh. For those who don’t know what a Java method is: it’s basically going to the Muuum class and executing the code listed under the method kjdhfdkjg or idufhidufh.
 I followed the code to the Muuum class file and found out its purpose was to set a variable to contain an URL. Two variables are set to contain part of the URL and they are then used to build the entire URL. One URL that is built is hxxp://www.seyminck.com/ FFFO009 /560[dot]gif and this was the URL I found in the Java index 46e770f3-38b55d85.idx showing it was where the executable file 46e770f3-38b55d85 (MD5 hash 2e833ac26483aaad13a8051bc857ef15) came from. The screenshot below shows the URL being put together.
 I went back to the Wall class and kept reading the code until I came across the first Java function as shown below. The Inputstream function reads data and the data being read was coming from the Java method Kkdjfhgdkfjhgkdfjhgkkkkkkkkkkkk.sodarifhsdoiufhdoiufg86fetgfyusgfyudif. I highlighted the Inputstream function in green while the Java method is highlighted in red.
 The followed the code to the sodarifhsdoiufhdoiufg86fetgfyusgfyudif method. The method set the variable URL to contain the value contained in variable s3 which the Wall Java class passed to the method. The method ended with by returning a call to another method in the Kkdjfhgdkfjhgkdfjhgkkkkkkkkkkkk class as highlighted in red below.
 Next I went to the mmmm3 method which is pictured below. The first function InputStream sets the URL to read from while the second function Openstream reads the URL stored in the URL variable. I couldn’t find the code that resulted in the URL variable containing the domain hxxp://www.seyminck[dot]com. However, this was the URL the method was reading from becaue the Jar file didn’t reference any other websites. The method returns to the Wall class the data read from the URL.
 I went back to the Wall class and continued to follow the code. The next portion I picked up on is the data read from the URL was saved to a file with an exe extension. The picture below shows the code that accomplished this and I highlighted a few areas to make it easier to see. The variable ufy highlighted in the first red box was set to contain a string with a random number ending in .exe. The next variable iioi655er5w5 (highlighted in blue) was set to contain another variable concatenated with the ufy variable at the end. This means the string contained in iioi655er5w5 ends in .exe. The function FileOutputStream writes data to a file and names the file with the string in the iioi655er5w5 variable.
 The previous code explains the activity on the system immediately after the exploit was downloaded. Reading the URL hxxp://www.seyminck.com/FFFO009/560[dot]gif resulted in Java caching the file while Java wrote the data to a file with an .exe file extension. The Java index file 25e8c780-5c17647b.idx showed that the file 46e770f3-38b55d85 (MD5 hash 2e833ac26483aaad13a8051bc857ef15) in the Java cache was read from the URL in the Java exploit. Another file with the same MD5 hash was created on the system at the same time and was named a random number with exe as the file extension.
At the bottom of the previous screenshot shows the Java method Kkdjfhgdkfjhgkdfjhgkkkkkkkkkkkk.kjsf8888 being called and the variable iioi655er5w5 (contains the filename ending in .exe) is passed for the method to use. The picture below is a close up of the method call.
 My journey following the code ended when I went to the kjsf8888 method in the Kkdjfhgdkfjhgkdfjhgkkkkkkkkkkkk class file. The code highlighted in green in the picture below highlights the function Runtime exec executing the file contained in the iioi655er5w5 variable which is a file whose name is random number with an .exe extension (seems like this file 0.945837921339929.exe found on the system). The activity on the system after 0.945837921339929.exe was created in the temp folder was another dropper (MD5 hash a70e5c48612159b3e936d7e478f4d451) showing up on the system. To me this further confirms the Jar file was successful in exploiting a vulnerability in Java and this was how the system became infected in the first place.
 Summary
I went into the examination planning on to perform a surgical malware removal and ended up doing a complete system rebuild due to how bad the infection was. The initial infection vector was a user surfing the Internet and coming across a website hosting third party content which resulted in a successful drive-by download targeting some Java vulnerability. Going back to the person and telling them how the infection happened makes it easier for them to change what lead up to the issue. I would have done a disservice if I skipped trying to find the IIV and went back to the person with a laundry list of recommendations. Enable the firewall, use strong passwords, update anti-virus software, use caution with opening attachments, use caution clicking on links, update computer software, etc … Throwing out a laundry list of recommendations is a lost opportunity to improve security since it doesn’t address the root cause. Trying to implement five or ten recommendations is a lot harder than focusing on the one recommendation that actual caused the infection.
Identifying the IIV is a challenge worth confronting. For success one not only needs to understand the forensic artifacts located on a system and their significance but needs to know about attack vector artifacts and how to recognize them. Being able to understand both artifacts types can help in answering the question how did malware end up on the system.
There are various reasons provided why an examination isn’t performed on a malware infected system to locate the IIV. I first wanted to point out why taking the time to find the IIV is beneficial instead of focusing on the reasons why people don’t. The purpose of the root cause analysis is to identify the factors lead up to the infection and what actions need to be changed to prevent the reoccurrence of a similar incident. If the infected system is just cleaned and put back into production then how can security controls be adjusted or implemented to reduce malware infecting systems in a similar manner? Let’s see how this works by skipping the root cause analysis and placing blame on a user opening a SPAM email. A new security awareness initiative educates employees on not opening SPAM email which does very little if the malware was a result of a break down in the patch management process. Skipping figuring out the IIV is not only a lost opportunity for security improvements but it prevents knowing when the infection first occurred and what data may have been exposed. This applies to both organizations and individuals.
Determining how the malware infected a system is a challenge but that's not a good enough reason to not try. It may be easier to say it can’t be done, takes too much resources or it's not worth it since someone (aka users) never listen and did something they weren’t suppose to. As a learning opportunity I’m sharing how I identified the initial infection vector in a recent examination by showing my thought process and tool usage.
First things first… I maintain the utmost confidentiality in any work I perform whether if it’s DFIR or vulnerability assessments. At times on my blog I write detailed posts about actual examinations I performed and every time I’ve requested permission to do so. This post is no different. I was told I can share the information for the greater good since it may help educate others in the DFIR community who are facing malware infected systems.
Background Information
People don’t treat me as their resident “IT guy” to fix their computer issues anymore. They now usually contact me for another reason because they are aware that I’ve been cleaning infected computers for the past year free of charge. So it’s not a strange occurrence when someone contacts me saying their friend/colleague/family member/etc appears to be infected with a virus and needs a little help. That’s pretty much how this examination came about and I wasn’t provided with any other information except for two requests:
* Tell them how the infection occurred so they can avoid this from happening again
* Remove the viruses from the computer
Investigation Plan
The methodology used throughout the examination is documented on the jIIr Methodology Page. I separated the various system examination steps into the first three areas listed below.
1. Verify the system is infected
2. Locate all malware present on the system
3. Identify the IIV
4. Eradicate the malware and reset any system changes
I organized the areas so each one will build on the previous one. My initial activities were to verify that the system was actually infected as opposed to the requester interpreting a computer issue as an infection. To accomplish this I needed to locate a piece of malware on the system either through antivirus scanning or reviewing the system auto-run locations. If malware was present then the next thing I had to do was locate and document every piece of malware on the computer by: obtaining general information about the system, identifying files created around the time frame malware appeared, and reviewing the programs that executed on the system. The examination would require since the technique excels at highlighting malware on a system. The third area and the focus of this post was to identify the initial infection vector. The IIV is detected by looking at the system activity in the timeline around the timeframe when each piece of malware was dropped onto the system. The activity can reveal if all of the malware is from the same attack or if there were numerous attacks resulting in different malware getting dropped onto the system. The final area is to eradicate every malware identified.
Note: Some activities were conducted in parallel to save time. To make it easier for people to follow my examination I identified each activity with the symbol <Step #>, the commands I ran are in bold, and registry and file paths are italicized.
Verifying the Infection
The computer’s hard drive was connected to my workstation and a software write blocker prevented the drive from being modified. I first reviewed the master boot record (MBR) to see the drive configuration I was dealing with and to check for signs of MBR malware <Step 1>. I ran the Sleuthkit command: mmls.exe -B \\.\PHYSICALDRIVE1 (the -B switch shows the size in bytes). There was nothing odd about the hard drive configuration and I found out that additional time was needed to complete the examination since I was dealing with a 500 GB hard drive. To assist with identifying known malware on the system I fired off a Kaspersky antivirus scan against the drive <Step 2>.
Knowing the antivirus scan was going to take forever to complete I moved on to checking out the system’s auto-runs locations for any signs of infection. The Sysinternals AutoRuns for Windows utility was executed against the Windows folder and the only user profile on the system <Step 3>. In the auto-runs I was looking for unusual paths launching executables, misspelled file names, and unusual folders/files. It wasn’t long before I came across an executable with a random name in the HKCU\SOFTWARE\Microsoft\Windows NT\CurrentVersion\Winlogon\Shell registry key.


Locating All Malware on the System
After I verified the system was in fact infected I then proceeded to locate and document every piece of malware. First I had to shed light on the system’s configuration since it would impact how I performed my analysis <Step 5>. I used my regripper-general-os-info.bat batch file to run RegRipper against the system’s registry hives including the one profile’s NTUSER.dat hive. Below I highlighted some information and to the right of the arrow are quick notes about its significance.
* Operating system was Windows 7 Home Premium <= affected what artifacts are available and where they are located
* OS Install Date was Sun Feb 20 23:26:29 2011 (UTC) <= may assist with identify activity occurring before this date
* Timezone was Eastern Standard <= needed to understand time information
* The registry setting NtfsDisableLastAccessUpdate was enabled <= can’t use files’ last access times since it’s not tracked (default setting in Windows 7)
* Profilelist registry key only showed one user account besides the default ones <= focused the examination around the activity for one specific user account
* Installer\UserData registry key showed the following programs: Microsoft Office 2010 including Outlook, iTunes v.10, QuickTime v.7.69, Adobe Reader v9.3.4, and Java(TM) 6 Update 17 <= identified applications that could have been responsible for the malware infection
* Default browser plugin showed the default browser was Internet Explorer <= system had two web browsers (Chrome was the other) so my initial focus is on the artifacts from the default one
* Listsoft registry key showed McAfee <= McAfee antivirus software was on the system and its logs may show additional information about the infection.
I opted for the timeline analysis technique to locate all malware on the system and the general information obtained about the system helped to narrow down my artifact list to incorporate into my timeline. Building a timeline on a 500 GB hard drive was going to take some time so I looked at the McAfee logs before tying up my workstation <Step 6>. I exported the McAfee logs with FTK Imager and reviewed them using Notepad ++. The last entry in the log occurred at 10/16/2011 6:50:09 PM and it logged that the file "C:\windows\system32\consrv.DLL" was detected as Generic.dx!bbd4. The next entry didn’t occur until 10/12/11 but there were numerous log entries leading right up until 10/08/11. A few detections included Generic Dropper!1cj, DNSChanger!fa, and Artemis!E4C2A000E715 and they were for files located the folders C:\Users\John_Doe\AppData\Local\Temp\, C:\Windows\assembly\tmp\, and C:\windows\syswow64\. The flurry of McAfee detections for files other than cookies stopped at 10/8/2011 11:37:38 PM as shown in the picture below.

Identify the IIV
Locating all malware present on the system and identifying the IIV are not separate activities when I perform timeline analysis. The only reason I separated them was to make it easier to explain my thought process. In actuality the two go hand in hand. Each time a piece of malware is located the system activity around the malware is examined to determine what contributed to the malware being created. Approaching timeline analysis in this manner will help determine if the malware is from the one attack or multiple attacks at different points in time. I review timelines working backwards in time since I find that it’s easier to spot the IIV. Each time I come across a file that could be malicious I first review the file’s header (in this examination I used FTK Imager), perform searches for the file’s MD5 hash (search order is Malware Analysis Search, VirusTotal, and then Google), and at times if the hash search results in no hits and the file type is of interest then I may upload the file to VirusTotal to see if it’s detected. I continue this process in the timeline until I reach the point where the malware activity stops and that’s usually where the IIV is located.
To assist with confirming malicious files I used FTK Imager to export a file hash list for the entire hard drive <Step 8>. It’s a lot easier to already have files’ hashes on hand then it is to calculate the hash each time I come across a new file. I started working my timeline keeping in mind everything I found including the timeframe 10/16/2011 6:50:09 PM to 10/08/11 11:37:38 PM. Besides the timestamps that were not accurate (reflects activity in future) the timeline ended on 10/16/2011 so that is where I started my analysis. I first saw the consrv.dll file detected by McAfee but there were no artifacts around the malware indicating it was the result of a different attack.


I kept working the timeline going backwards in time. I kept finding more malware and malware artifacts but nothing pointing to an IIV explaining how the malware got onto the system. I finally reached the earliest time I noted which was 10/08/11 11:37:38 PM. There was a lot of activity involving files with similar names to the ones reflected in the McAfee log file.


More Information about the IIV
The Java archive 25e8c780-5c17647b (MD5 hash 6b478de65071d94c670a0bfa369a7890) didn’t have to be examined closer in order to identify the IIV. However, I wanted to better understand how to examine Jar files since they may provide more information about the IIV and help explain some files found on the system. I debated if I should put this section in another blog post because I didn’t want people to think this activity had to be done in order to figure out the IIV. I opted to include the information since it sheds light on what occurred when the exploit was downloaded.
The code in the Jar file was obfuscated to conceal its purpose. I reached out to the Win4n6 group about any methods to automate analyzing Jar files with obfuscated code. A few members pointed me to Java de-obfuscation tools and I’m still in the process of trying to learn how to use them. Another member mentioned that Java obfuscation appears to be not making analysts’ life difficult, but to evade detection by antivirus. The person went on to say the obfuscation is usually weak so it’s relatively simple to de-obfuscate. My first reaction was it may be simple for Java programmers but it seemed impossible to me; I know nothing about Java besides the artifacts left by Java exploits. I took a shot at manually trying to see what the Jar file did by focusing on trying to follow the logic associated the variables, class methods, and functions in the code (I don’t know the Java syntax so if I butcher the names of things such as functions then you know why).
I opened the Java archive 25e8c780-5c17647b in JD-GUI and looked at the manifest file to see the wall Java class gets executed first.


At the bottom of the previous screenshot shows the Java method Kkdjfhgdkfjhgkdfjhgkkkkkkkkkkkk.kjsf8888 being called and the variable iioi655er5w5 (contains the filename ending in .exe) is passed for the method to use. The picture below is a close up of the method call.


I went into the examination planning on to perform a surgical malware removal and ended up doing a complete system rebuild due to how bad the infection was. The initial infection vector was a user surfing the Internet and coming across a website hosting third party content which resulted in a successful drive-by download targeting some Java vulnerability. Going back to the person and telling them how the infection happened makes it easier for them to change what lead up to the issue. I would have done a disservice if I skipped trying to find the IIV and went back to the person with a laundry list of recommendations. Enable the firewall, use strong passwords, update anti-virus software, use caution with opening attachments, use caution clicking on links, update computer software, etc … Throwing out a laundry list of recommendations is a lost opportunity to improve security since it doesn’t address the root cause. Trying to implement five or ten recommendations is a lot harder than focusing on the one recommendation that actual caused the infection.
Identifying the IIV is a challenge worth confronting. For success one not only needs to understand the forensic artifacts located on a system and their significance but needs to know about attack vector artifacts and how to recognize them. Being able to understand both artifacts types can help in answering the question how did malware end up on the system.
Labels:
attack vectors,
java,
malvertizing,
malware,
tools


Corey,
Did you happen to see the JavaFX key LastWrite time being updated, as you did when you posted your exploit artifact findings?
Exceptional post and work. I just saw this link from Harlan's blog. I just subscribed. Thanks for posting this. I will be sharing this in my classes.. This is a clear demonstration of a seasoned DFIR professionals thought pattern when dealing with events.
@Harlan
I didn't look for the key at the time since I found so many other Java artifacts. I haven't wiped the registry hives yet so I took a quick look for the key. The HKCU\Software\Javasoft\JavaUpdate registry key wasn't there. The only sub key under Java soft was "Java Runtime Environment". I even searched for the JavaFX key and it wasn't on the system.
I don't know what creates the JavaUpdate key but I do know that Java was never updated on the system.
@Jonathan
Thanks for the comment and I hope the material helps out your class. If they want my information about the steps I did and why I did them there's more information on my methodology webpage. I link to other posts where I discussed the step and I cite the references I used.
Fantastic work, Corey! I have a malware analysis coming up, and your methodology is quite logical. +1 to Jonathan -- it's always awesome to see the stream of consciousness of an expert at work.
@jmcjay
Thanks for the comment. If you have a malware analysis coming up then I would also check out the books: Malware Forensics Investigating and Analyzing Malicious Code and Windows Forensics Analysis 2nd Edition. Both books are great references.
Hi Corey,
Firstly, fantastic post. This article and a number of others you've written in regards to java artifacts has greatly increased my knowledge. In fact so much that now sitting in front of me is some highly obfuscated java code which is bugging me that i've been unable to deobfuscate it.
Do you have any articles you'd recommend for de obfuscating jar files. In particular i'm keen to deobfuscated one particular string.
Many thanks in advance.
@Sploit
That's the topic I am going to address in a post. Should be one of my next 3 posts. I haven't seen too many write-ups about it but Kahu Security blog has one or two articles
Very entertaining read. Great article.